DECromancer has had a long-standing focus on the value of individual contribution to
vintage computer and data preservation, including appropriate attribution of
documentation and source code. AI and LLMs, by their nature, are unable to provide
the necessary assurances that the generated material is compatible with these goals,
the licenses of our own documentation and code, or that any material has been
appropriately attributed to its original authors.
Thus, we expressly forbid contribution of material generated by AIs or LLMs and similar
technologies to our hosted projects. This includes, but is not limited to, source code,
documentation, commit messages, or assets used on our website.
We further do our best to only carry hardware for sale and sponsor software projects
developed under these same guidelines. While we cannot guarantee this is true for all of
our products for sale, it remains true that we will preferentially work with vendors who
share a similar set of values.
Our Revision D MFM Emulators come with an upgrade already present on
our QBone boards: peripheral expansion connectors.
The tiny JST SH (1mm spacing) connector is compatible with all Qwiic and Stemma QT devices. With literally hundreds of devices out
there, this is the fastest and cheapest way to add physical interfaces to the emulator.
We used a SparkFun Qwiic joystick and a SparkFun Qwiic
Alphanumeric Display in purple for
this little demo, written entirely in a short shell script. Press the button and the
text MFME appears. Check the comments in the script for further details. It would not be
difficult to mount the display and joystick as a way to display more information about the
currently loaded image, or reconfigure options and start/stop/restart the emulator.
You can also use the 18-pin FPC flat-cable connector with most Adafruit "EYESPI" displays. However, you must use an A-A
(top on both sides) cable. Do not use the Adafruit A-B cable (connectors "flipped" on
opposite ends) when connecting displays. We have tested and recommend the GCT
05-18-A-0127-A-4-06-4-T 5 inch
cable available for under CAD$2.
This demo video uses that cable and an Adafruit 2.8" TFT LCD with capacitive touch. It manages full-screen video playback, though
it is running without emulation running at the same time. We don't expect you want to
display full-screen video during emulation, but you should be able to provide a nice menu
and touch-based interface for control and feedback if that strikes your fancy.
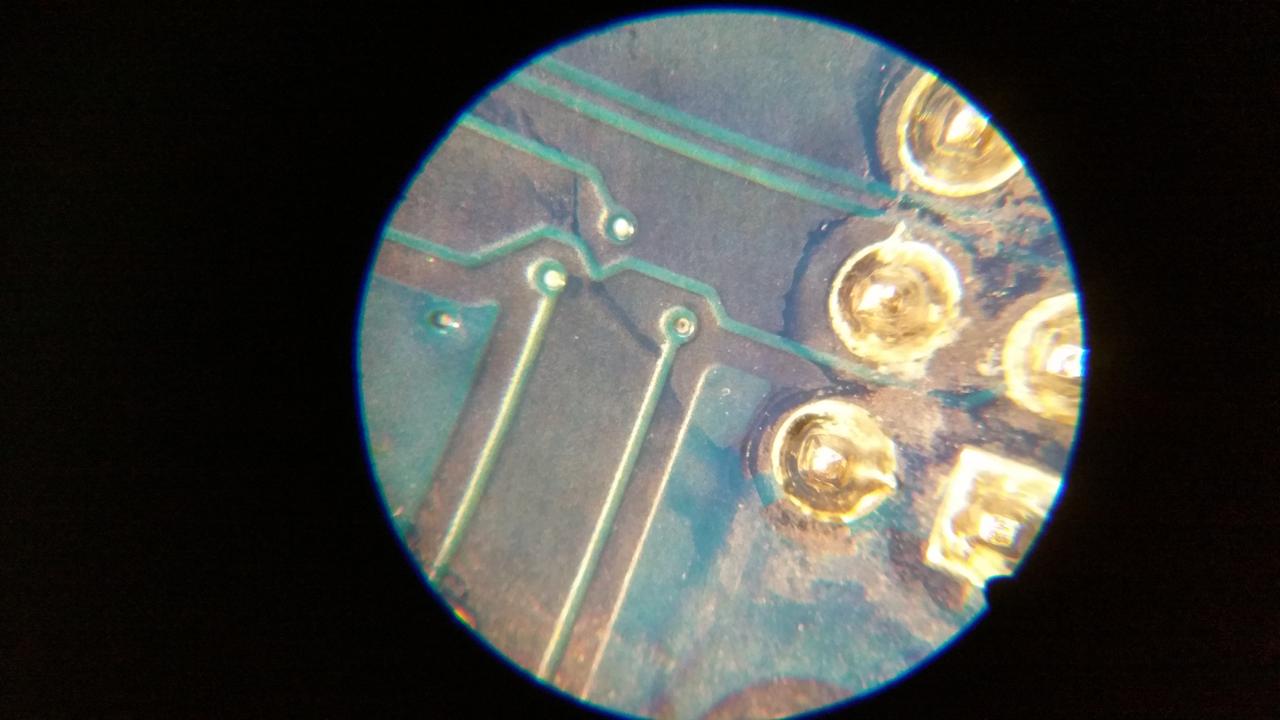
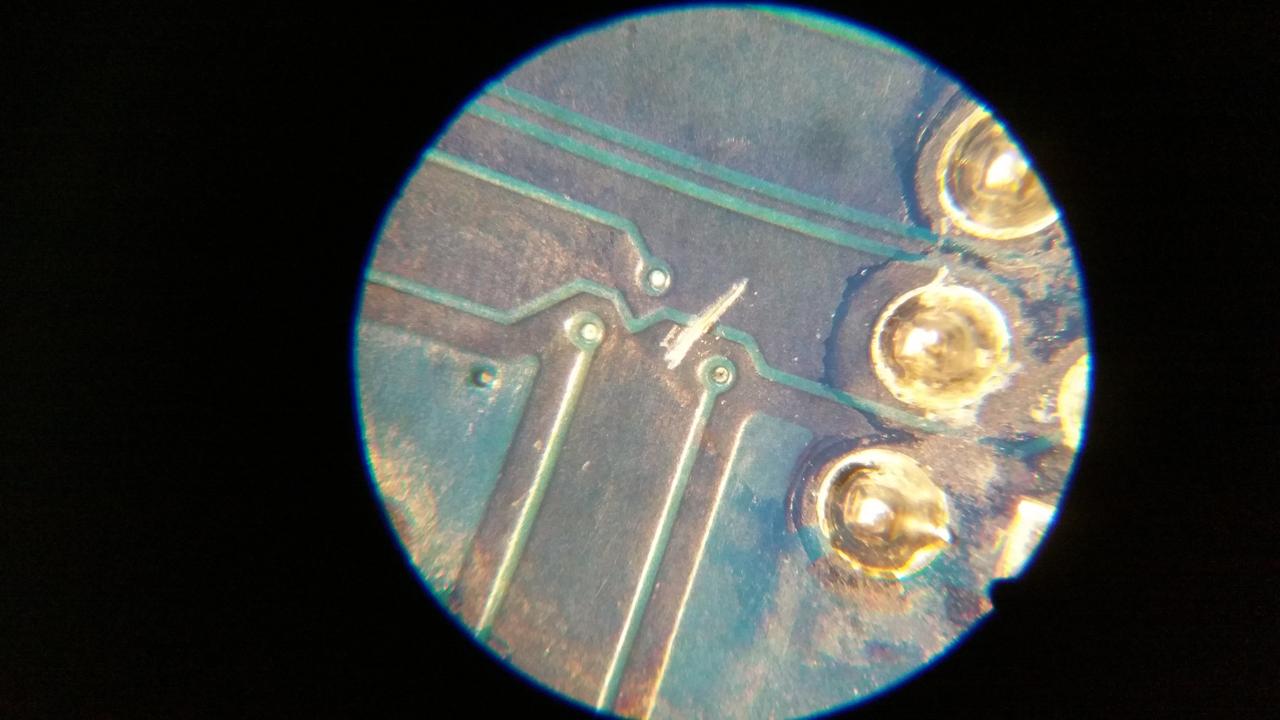
Please note that our earlier Rev D boards have an error in layout that requires cutting a
trace. If your Rev D emulator has the 2D square barcode on the back, and a silkscreened
serial number, you don't need this fix. Otherwise, cut the angled trace on the back side
near the EYESPI connector to field-patch your MFM emulator:
The PCB is only two-layer, so don't worry about cutting through interior traces. There
aren't any.
I have held back publishing this information for a while, but I shouldn't have. Sorry
about that. There's simply not enough hours in the day for me to integrate this as fully
as I'd like into emulation. Hopefully the information provided is enough for those of you
in the community have more time. And who knows, maybe I'll find time over the winter
holidays.
Update, 24 Oct 2025: Canada Post has resumed shipments, but with increased times.
We have re-enabled Canada Post for the least expensive shipping option - but shipping
times will be increased. Our flat shipment price is also available and will still go out
via DHL as an alternative. There are no guarantees on delivery timelines for Canada
Post. You have been warned!
Original post follows.
Unfortunately, negotiations between Canada Post and the Canadian Union of Postal Workers
have broken down, with staff walking off the job.
While we hope that the Postal Service and the Union reach an agreement quickly, we
currently have no alternative but to increase shipping costs. Here is the current state of
affairs, broken down by shipping destination:
Canada: Canadian customers can still choose Purolator at the checkout for domestic
shipping. Sadly this is about $10 more expensive than Canada Post was, but you will at
least get your package with minimal delay.
United States: The only shipper we can use with our system for you right now is DHL.
Shipping typically comes to $35 plus calculated pre-ship duties, as is now required. For
now, this is a fixed price. Should our cost to ship to you be more than $10 higher, we
will contact you to pay the remaining amount before shipping your order.
Everyone else: We also can only use DHL to ship to you right now. Shipping costs are
fixed at $50, and may or may not offer the chance to pre-pay duties, depending on
destination. Should our cost to ship to you be more than $10 higher, we will contact you
to pay the remaining amount before shipping your order.
Just like last time, all our carriers will experience major delays while Canada Post is
on strike. Even express shipments will be delayed in transit. Carriers will likely remove
their on-time guarantees and offer minimal support for shipping delays. We have no control
over the transit time once a shipment leaves our warehouse. There is no solution we can
offer for time-sensitive orders.
We apologise for the interruption, and hope to return to normal as soon as possible.
We've been monitoring the US tariff situation very closely over the course of 2025.
Deliveries to the US were unaffected, up until August 29th. Unfortunately, as of
that date, all Canada-to-US shipments must now be sent as DDP (Deliver Duty
Paid).
How it used to work
Previously, all of our shipments were sent DDU (Deliver Duty Unpaid). That means we
charged you for the product, and the shipping label, and the carrier picked up your
shipment from our office.
Your carrier (usually, the USPS) would then determine if the package required any duties,
and if necessary, contact you for payment before delivering your package.
Almost all of our orders were under $800, so they fell under the de minimis exemption
($800 since 2016; $200 since 1930) and you were charged no duty.
How it works now
As of August 29th, the US has suspended the duty-free de minimis import exemption. All
shipments are now subject to duty. Exactly how much duty is constantly changing.
As of this writing, the baseline rate is 35% for most products made in Canada, with some
exceptions for CUSMA-compliant items. We also sell products made in China; duties on these
shipped to the US vary from 10% to as high as 70% (!)
Our shippers, including Canada Post, Purolator, and DHL, no longer accept shipments to the
US that do not have pre-paid duties. This means we must collect these duties from you in
the checkout process, or we cannot generate a shipping label and send the parcel to you.
You'll see the exact amount of duties charged in the checkout after you enter your
shipping address and select a shipping option. Be prepared for 25-35% markup: it's not
pretty.
This sucks. We hate it. If you are a US-based customer, and you hate it too, complain to
your federal, state, and local representatives. Maybe this policy can be reversed.
Customers in Canada, and the rest of the world - everything remains the same. Order as
always, receive product as always.
We apologise for the change, and hope to return to how things were as soon as possible.
Update, Saturday, 24 May 2025: The CUPW have announced they are not going on strike
for now, just refusing overtime. While this will slow down all deliveries, it means we can
re-enable Canada Post shipping for now. Please be patient as your shipments may take
longer than usual.
Unfortunately, the Canadian Union of Postal Workers has announced it intends to begin strike activity on Friday, May
23rd at 12:00 AM local time.
While we hope that the Postal Service and the Union reach an agreement quickly, we
currently have no alternative but to suspend shipments outside of Canada immediately.
This means there are no US or International shipping options at checkout right now.
Canadian customers can still choose Purolator at the checkout for domestic shipping.
We are doing this today (Wednesday, May 21st, 2025) because any packages that don't leave
Canada by Thursday night would get stuck in the system until the strike ends. If that
happened to your order, there would be nothing we could do about it, and everyone would be
unhappy.
For US and International orders, if you are placing an order greater than C$200 (such as
for MFM emulators and QBones, or bulk SCSI product orders), please email us and we can quote you alternative shipping options (such
as FedEx). This will be more expensive than usual, and will take an extra 1-2 business
days for turnaround.
All carriers will experience major delays while Canada Post is on strike. Even express
shipments will be delayed in transit. Carriers will likely remove their on-time guarantees
and offer minimal support for shipping delays. We have no control over the transit time
once a shipment leaves our warehouse. There is no solution we can offer for time-sensitive
orders.
We apologise for the interruption, and hope to return to normal as soon as possible.
When we ran out of QBones earlier this year, I groaned loudly. I knew it was time to
revisit the complaints we'd received from customers since we first started making them in
2021:
"The board is too tall with the Beaglebone installed, and runs into cards both above and
below it."
"I'd like to use my peripherals with the QBone. "
"It's too wide for my dual-width QBUS backplane."
"I keep losing the jumpers."
"I can't find driver chips anymore."
That last one is me, actually. Our supply of chips and spares exhausted at the same time
as when the last board went out the door. Without drivers, we weren't going to be selling
any more QBones.
In 2008 Eric Smith did an analysis of alternative driver chips, and concluded the TI
AM26S10 and SN75138 would be acceptable (if not perfect) replacements for the long-since
obsolete DS8641 and DS3662 parts. Sadly both parts went EOL when TI decided to shut
down their 150mm wafer process. (This also killed off many of their popular older RS485
parts, such as MC3486/MC3487.)
So despite Jörg (aka Joerg) Hoppe's respin of the board in 2024, it was too little too
late; the last-time buy window was closed, and stock at most resellers was gone or was
restricted in volume to select (read: US Governmental) purchasers only. (We tried.)
Things were looking bleak until we got lucky in Shenzhen. A retailer was willing to sell
us sufficient DS3662s, but only in surface mount form. We acquired enough to make another
run of QBones and/or Unibones.
That left the other issues, and sorting out how to make surface-mount driver chips
swappable for failure or misuse.
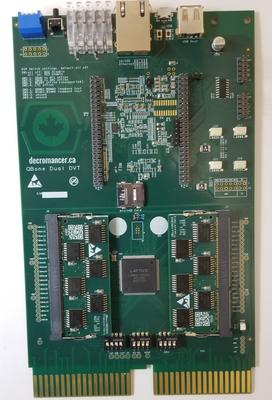
After going heads down for a few months, we have the answer: the new QBone Dual.
Design Verification Test unit. Final product will look a bit different.
What's cool about the new QBone Dual? Well:
No Beaglebone. We've integrated the entire TI Sitara CPU, DDR3, and support
circuitry right into QBone Dual. No surprise costs!
Fits within a standard QBus dual-wide slot. We took extra care to ensure DEC's
original QBus specs were respected:
A refined back panel. From left to right: handle (not shown), USB-A, microUSB,
midplane Ethernet RJ45 connector, 10x status LEDs, User button, 4-position piano DIP
switch.
All configuration via DIP switch. No more jumpers! We even printed the reference
chart right on the PCB for you.
Swappable drivers on SODIMM-sized boards. Do not put DDR RAM in these! The
pinout is custom to QBone Dual. Each board holds 6x DS3662 drivers. Due to extremely limited
supply, we won't be selling these separately, but we will be providing an exchange service
for our customers who have failed driver chips.
I2C expansion via qwiic/Stemma QT connectors. There will only be 2 of these on the
final product, not 4, but here's a preview of what you can do with parts from Sparkfun
or Adafruit:
Backward compatible with existing QBone accessories. You still get 2x
QBone-compatible serial ports and the 14-pin expansion port. These are now resettable 1A
fuse protected, as are the I2C connectors.
First shipments of QBone Dual to you will be in January 2025. (Sorry, we were hoping to
have these to you for the holidays - timing didn't quite work out.) We'll start accepting
orders after the new year; the price will be slightly less than we sold QBones for.
If you'd be interested in paying more for a QBone Dual Yukon Gold collector's edition,
with many of the same upgrades as last time, please get in touch. We'll start planning
for those as soon as these are well into production.
Keep up with us on Bluesky at@DECromancer, and let us know how you want to use the
new QBone Dual in 2025!
Update 2025-01-06: Canada Post is accepting all parcels now. Ship times
are still a bit slow. Please be patient!
It has been just over a month that DECromancer has been closed, due to
the Canada Post strike. As we were preparing to switch to a different
shipping provider, the strike has been ended (at least, for now).
While additional strikes may occur in the future, we hope to limit their
impact on our ability to fulfil orders.
We apologise for the interruption to all our current and future
customers, and welcome you back to the shop today.
Please be advised that Canada Post will not start accepting parcels
for shipment until Thursday, December 19th, 2024. We will not be making
any new shipments until then. Further, because of the backlog, shipping
times will be slow until at least January sometime. We thank you for
your patience.
We sell quite a few of ourZuluSCSIofferings. However, we've heard your
requests: you want a more affordable option. Maybe you don't use your vintage computer
that often. Or, maybe you're on a tight budget. (We certainly are!)
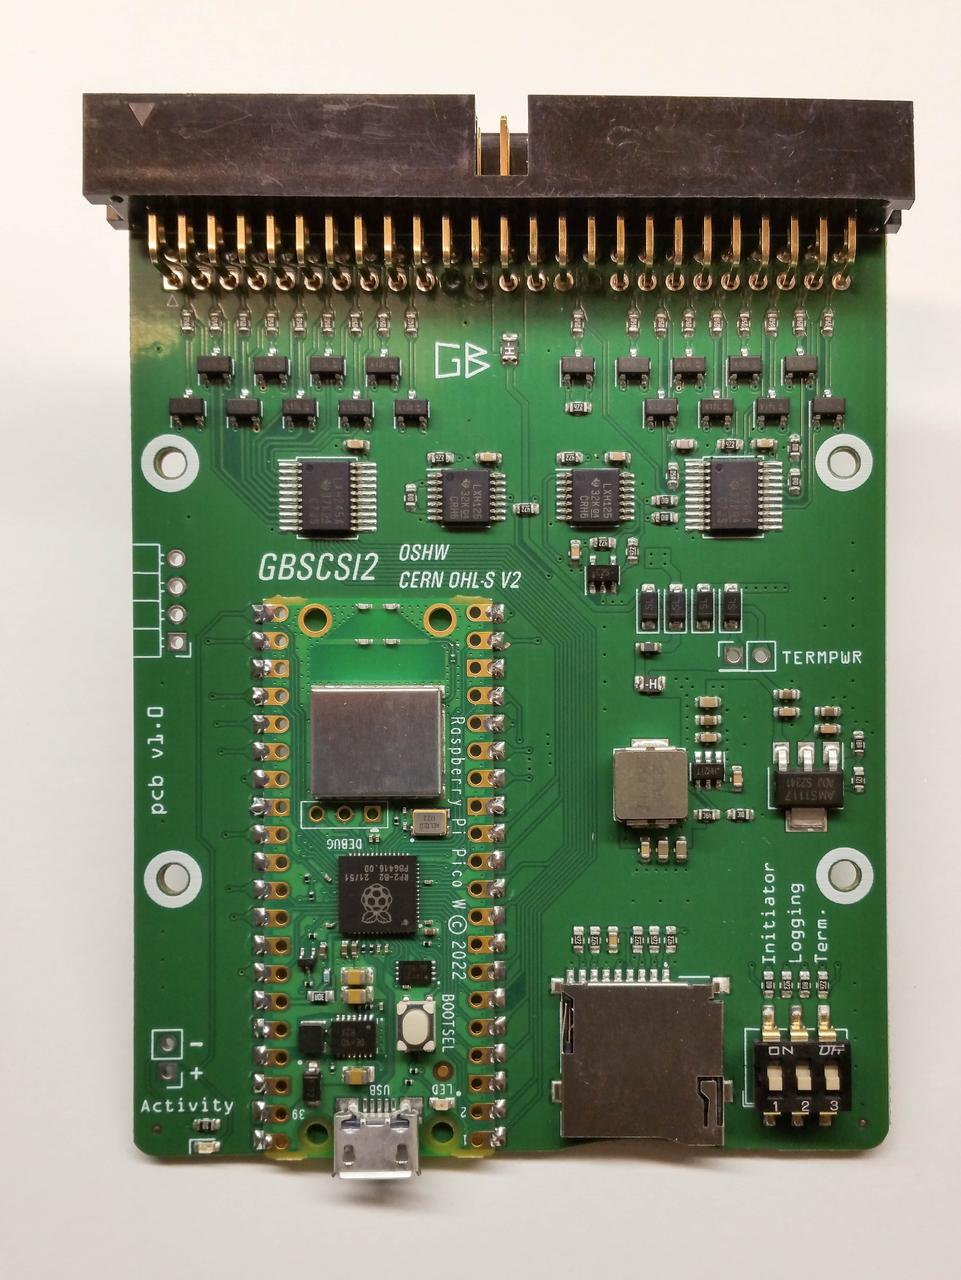
To that end, we're now carrying theGBSCSI2OSHW SCSI drive emulator. We'll continue to carry the
ZuluSCSI, and both boards use the same great firmware with the ZuluSCSI project's
approval.
We asked the board's designer, George Mezzomo, to talk a bit about designing the GBSCSI.
I started with disassembling my toys at an early age, learning how things worked, moved on
to collecting computers at age 10, and then all sorts of odd stuff, anything I could buy
cheap and fix to satisfy my curiosity. At some point in my early life I started doing my
own PCBs with sharpie and ferrochloride, copying designs from 80s magazines, and later
tried designing boards, but wasn't much good at it (due to not knowing how to use the
software properly). I then went to college to become an EE (where PCB design surprisingly
isn't really taught). I was dissatisfied with school and had recently lost my dad, so I
really needed something to occupy myself with. A colleague (and good friend) taught me the
basics of EDA, and I liked doing that so much I've decided that's what I want to do for a
job.
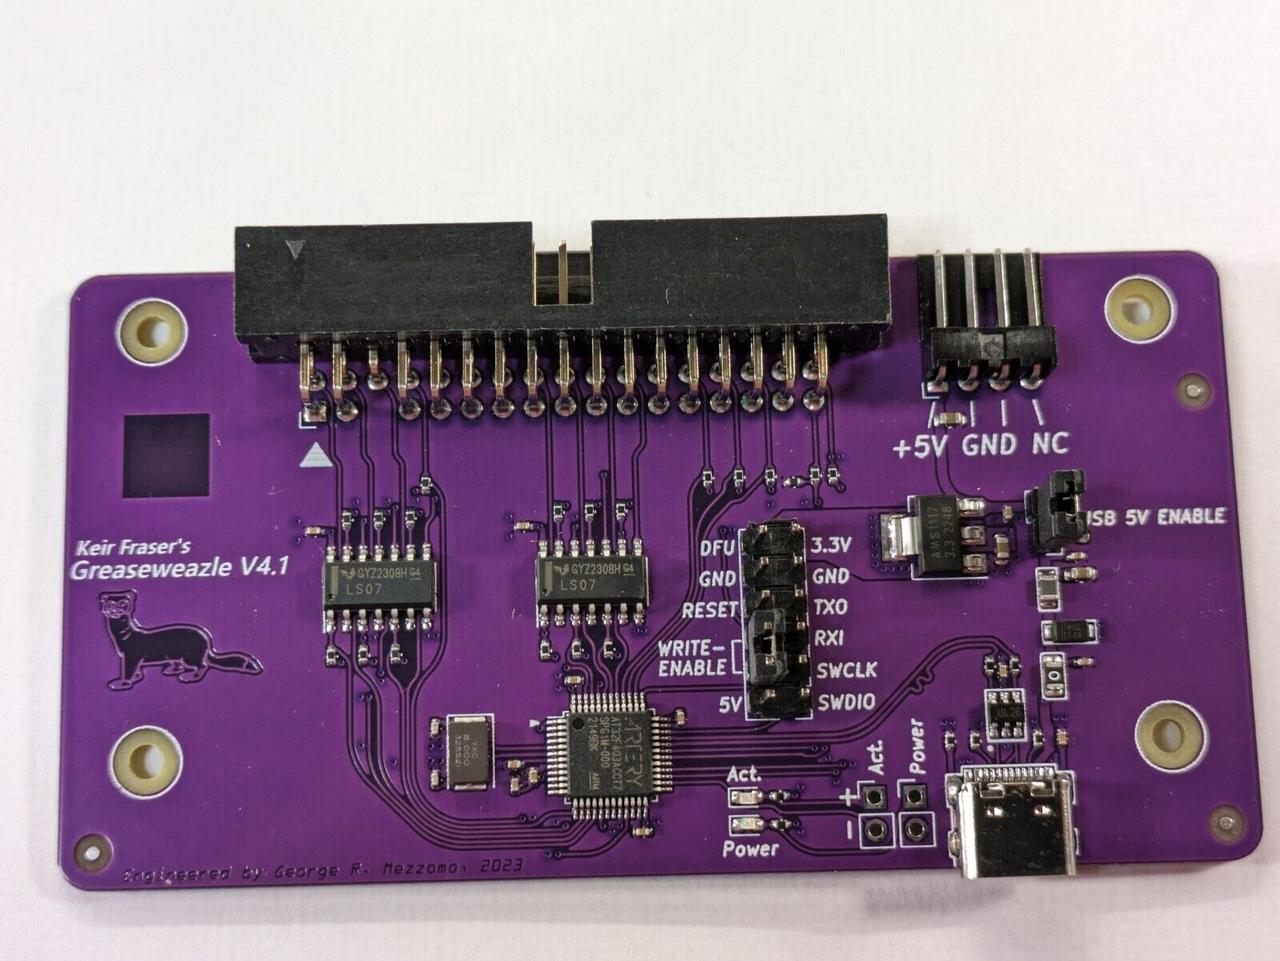
You're the PCB designer for theGreaseweazle. How did you get involved
in that project?
I had bought an Amiga 600 for peanuts, but writing disks for the Amiga from a PC involved
using a parallel port cable and DOS software - clunky, from a laptop, and results were
also often unreadable. Then Greaseweazle appeared, and made that much easier and
convenient - I could just use a cheap Bluepill board and a USB port, from within Windows
or Linux. However, STM32 fakes flooded the market, and buying a Bluepill that would work
with Greaseweazle became almost impossible. I decided I could use my newly-acquired PCB
design skills to create a board that bypassed the need for the Bluepill+adapter, one that
would have a STM32 from a known-good source fitted to it from the factory. Then this got
moved to a higher-performance variant, and, when STM32 parts became scarce during the
post-pandemic supply chain crisis, the design got yet again remade to use an improved
clone chip. This has now been polished and refactored into v4.1.
GBSCSI sort of appeared from the same pattern as the Greaseweazle: I wanted a cheap device
- in this case, one I could order preassembled in bulk to fit all my machines that needed
their failing storage replaced (and there were many of them). STM32 CPUs were impossible
to buy, and people were charging insane prices for Bluepills, fake or otherwise. Thus,
an ArdSCSIno-stm32 compatible PCB was lashed-up, and released as the original GBSCSI.
It originally used the cheapest clone chip I could find, which wasn't very good.
This was just cheap, devoid of any polish, but fulfilled my initial needs. However, SCSI
Disk Emulators have since progressed. Since I'm lazy, and a terrible programmer, I don't
want to maintain my own firmware, but I like having hardware tailored to my needs. GBSCSI2
was originally going to be a buffered variant of the earlier board, also STM32 (or
similar), but given the performance increase offered by devices based on the RP2040, the
decision was made to target compatibility with those.
I wanted a design that could fit all my machines, regardless of whether they used 2.5" or
3.5" disks, with a single PCB design. Ordering 25 identical boards is much more
economically efficient than ordering 10 of one design, and 15 of the other. This was the
original aim of the design. Other than that, it's mostly personal preference - where I
want my connectors and switches placed, that sort of thing. If I make my own board, I am
afforded the freedom to change those to what I consider most convenient for my use, but
also what friends I talked to would want.
Any other interesting projects coming up?
I have been meaning to refresh a few old designs and get them out the door - maybe they'll
get released for public consumption, once I test them. You can see my older designs
on GitHub. The real fun stuff is under NDA!
Thanks again, George, for taking the time to speak with us!
2022-11-05 Update: As of today, we've blown through our
initial ZuluSCSI v1.1 supply, and now stock the updated ZuluSCSI RP2040 design. These
new devices support synchronous transfer, which means read speeds have been measured
up to 9.5MB/s with suitable host hardware. Yet another win for the ZuluSCSI
development team! We're thrilled to be offering these for sale as of today.
Our original blog post about the ZuluSCSI is below. For more info on the history of the
ZuluSCSI product line, see the manufacturer's FAQ.
The global electronics parts shortage has not spared DECromancer. Back in April of 2022,
we sold the last of our SCSI2SD v5.2 stock. Despite high demand, we've not been able to
meet your needs - until now.
Shortly after we ran out of stock, Rabbit Hole Computing quietly
launched ZuluSCSI, a port of their SCSI2SD v6 code to the GigaDevice GD32F205 ARM
processor. We watched the project with great interest. It claimed better performance than
the old SCSI2SD v5.2, and has a much easier-to-use configuration: no more app, just edit
the ZuluSCSI.ini file on your SD card and copy your disk or CD-ROM ISO images to the
file!
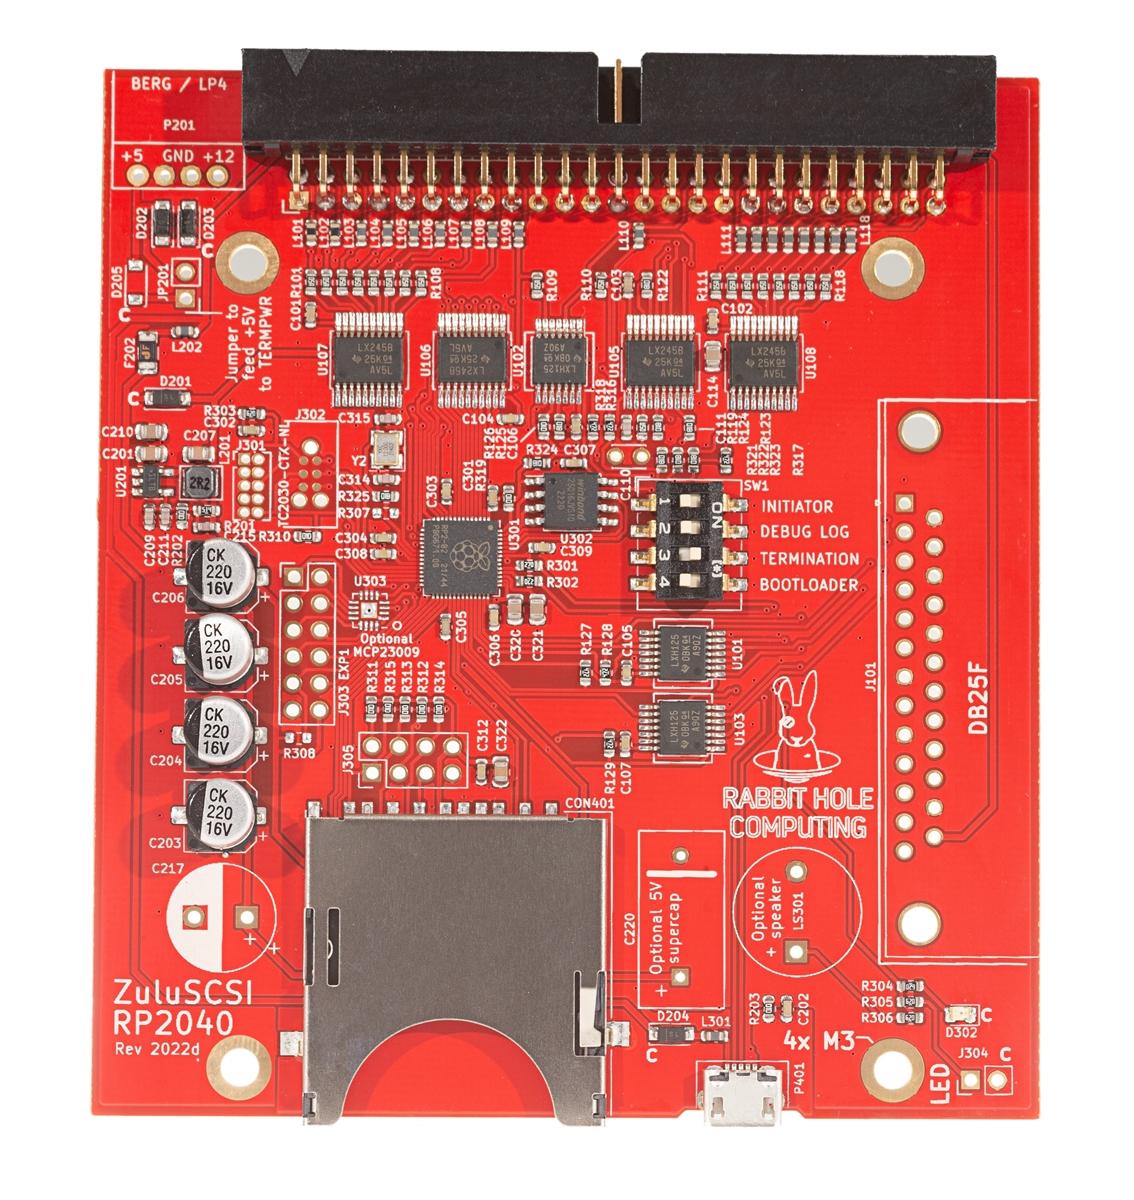
The ZuluSCSI RP2040.
But we didn't want to start carrying the product until we were sure it would work for the
vintage machines we support. The first good news came when Chicken Systems founder Garth
Hjelte roundly endorsed the ZuluSCSI's compatibility with samplers:
ZuluSCSI works with EVERY SINGLE SAMPLER we know of (which is all of them). All
Ensoniq, Akai, Akai MPC, Roland, Emu, Ensoniq, Kurzweil, Korg, Peavey, Synclavier,
Fairlight, Waveframe samplers. We don't provide a list because we haven't found a
sampler it DOESN'T work on.
Plus, we knew the STM32-based SCSI2SD v6 worked well in all sorts of vintage computers,
including our own collection. Things were looking up. But it was time to put the ZuluSCSI
to a torture test.
After chasing our tails for an hour over a bad 50-pin SCSI cable, we found the ZuluSCSI
worked flawlessly in a DEC PDP-11/23 (with CMD CQD-220 controller), an original NeXT Cube
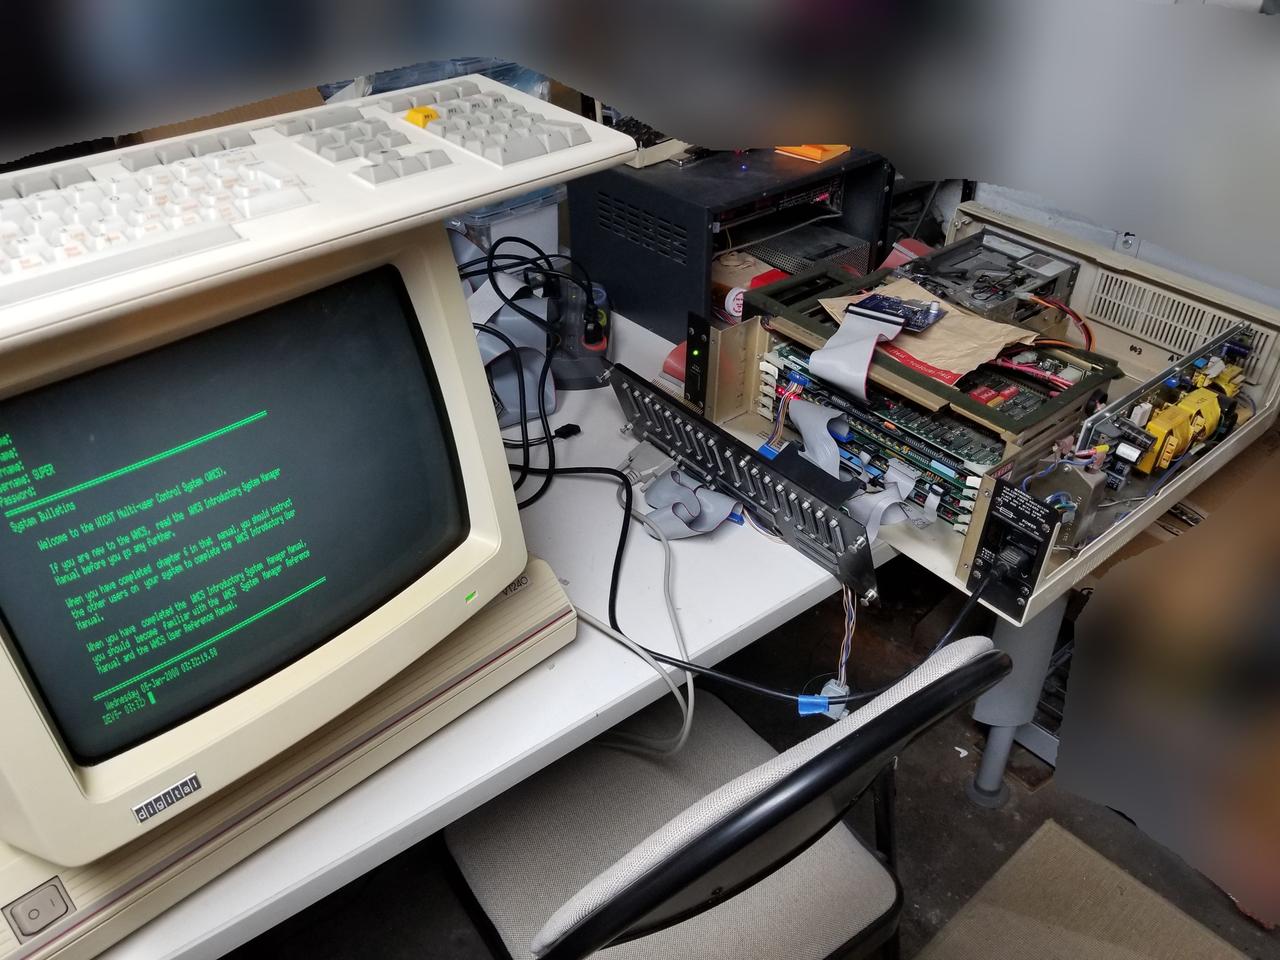
(NCR 53C90-based), and even the oddball WICAT S2150.
The ZuluSCSI running inside our WICAT S2150 (and DEC VT240 terminal).
We're very pleased with the performance and ease-of-use, and are proud to open sales up
through our web store.
Some quick tips from our experiences:
Use a FAT32-formatted SD card with a single, primary partition.
For a single hard drive, place your file on the card, named HD0.img.
For a CDROM image, use the name CD4.iso for SCSI ID 4.
Our WICAT needs 1024-byte sectors. Just rename the file HD00_1024.img to make it work.
(The first zero is the SCSI ID, the second is the LUN.)
If you need any special options, copy the zuluscsi.ini file onto your SD card and edit.
For very long SCSI cables, or machines without SCSI terminator power, you may need to
add a 4-pin Berg ("floppy") power header to the board. You can also add a jumper to let
the ZuluSCSI drive power SCSI termination on the cable if you like. (We'll offer adding
these headers to the boards for you prior to shipping in the near future.)
Recently, we had a customer complain that their MFM Emulator would get stuck in a boot
loop whenever they enabled automatic startup of emulation on boot (as you might like to do
when permanently installing the MFM Emulator in an old computer). We've been scratching
our heads as to what might have gone wrong - and finally reproduced the issue in our lab.
It turned out that wo issues were at fault here:
Our most recent units (S/N 070 and newer) have a slight resistor value change, and
This particular customer's 12V line in their vintage computer was sagging at 11.6V.
When enabling the MFM Emulator's "start emulating on boot" functionality, the
powerfail program is started in the background. powerfail monitors the 12V line to
see if it drops below 11.5V. If so, the program exits emulation and forces a shutdown,
syncing all data to the flash/USB drives attached.
The BeagleBone senses the 12V line through a simple resistor divider, divided down to
about 1.4V because the BeagleBone's analog-to-digital converter can accept a maximum of
1.8V. However, in the lab, the latest unit out of assembly read the 12.00V line at 11.6V!
Because of the small resistor values used, a difference of just 20 ohms accounts for this
major variation in sensitivity. And for our unfortunate customer, 11.6V read 0.4V low
would be well below the 11.5V threshold, forcing a reboot - and ending up in a boot loop.
The change of resistor value was forced by the global supply chain shortage in components,
meaning we were unable to source one particular resistor. Unfortunately, this resistor
acts as a divider on the 12V line, feeding the analog-to-digital converter on the
BeagleBone, which is used to detect a power failure situation.
The great news is that users of the MFM Emulator can fix this themselves in software.
Simply edit the file /etc/mfm_emu.conf and change the line
PowerFailOptions=""
to
PowerFailOptions="--scale 0.1213"
We've updated the pack-in letter to call out this change for anyone who may need it.
If you want to fully calibrate your unit's voltage measurement, you'll need a voltmeter.
Here's how:
Power the MFM Emulator via the 4-pin Molex connector, and ssh to your MFM emulator as root.
With your voltmeter, measure the voltage at the P3 (!2V) test point on the
emulator.
If the printed value does not match within 0.02V of the measured value, adjust the
scale value. Decreasing the scale value will increase the value measured by
powerfail.
Thanks to our customer for helping us debug this issue.